What’s up, everyone!
In my previous post I had some fun with scaling plans in Azure Virtual Desktop. Using scaling plans admins can configure settings for the autoscale feature to optimize the AVD environment.
Of course there are other solutions available that have their own advantages. Last year I wrote a post on creating host pools and configuring autoscale using Nerdio Manager for Enterprise. And since then the Autoscale function has improved so now it high time to review Nerdio’s autoscale function and find out what it can do for us.
Prerequisites
Here are the prerequisites if you want to follow along;
- Nerdio role: AVD admin (built-in) or desktop admin (built-in)
- A valid Azure subscription.
- Nerdio Manager (I used Enterprise)
Workspaces, host pools and desktop experience?
Let’s discuss these technical terms before we continue because selecting the correct host pool and desktop type is key to getting access to the features you need. So here is a quick recap;
What’s a workspace again?
A workspace is a container that holds one ore more host pools and session hosts. You can mix-and-match different host pool types (static and dynamic) and desktop experiences within one workspace. You can use RBAC at the workspace level to configure granular access to the workspace.
What are host pools again?
A host pool contains similar session hosts. Session hosts are VMs in Azure that host desktops or RemoteApps for your end users. NME has two flavors;
- Static host pools: a host pool containing similar session hosts without autoscaling features.
- Dynamic host pools: a host pool containing similar session hosts with autoscaling features. The feature actually might vary depending on the desktop experience. More on desktop experience below.
What is Nerdios desktop experience again?
Nerdio provides four desktop experiences;
- Multi user desktop (Pooled)
- Multi user RemoteApp (Pooled)
- Single user desktop (Pooled)
- Single user desktop (Personal)
Multi user desktop (Pooled)
This desktop experience;
- Provides a full desktop.
- Users are load balanced across available session hosts based on the current load.
- A session host is shared by multiple users.
Multi user RemoteApp (Pooled)
This desktop experience;
- Provides a RemoteApp only. There is no desktop available to the users.
- The RemoteApp is loaded on one of the available session hosts based on the current load.
Single user desktop (Pooled)
This desktop experience;
- Provides a full desktop.
- Users are load balanced across available session hosts.
- Only one user per session host.
Single user desktop (Personal)
This desktop experience;
- Provides a full desktop.
- Each user has a dedicated session host which means that they sign into the same session host each time they log in.
- Only one user per session host.
Now it’s time to checkout the autoscaling features. If you want to follow, make sure that you created a workspace and that you’ll be using dynamic host pools.
Multi user desktop (Pooled) auto-scale options
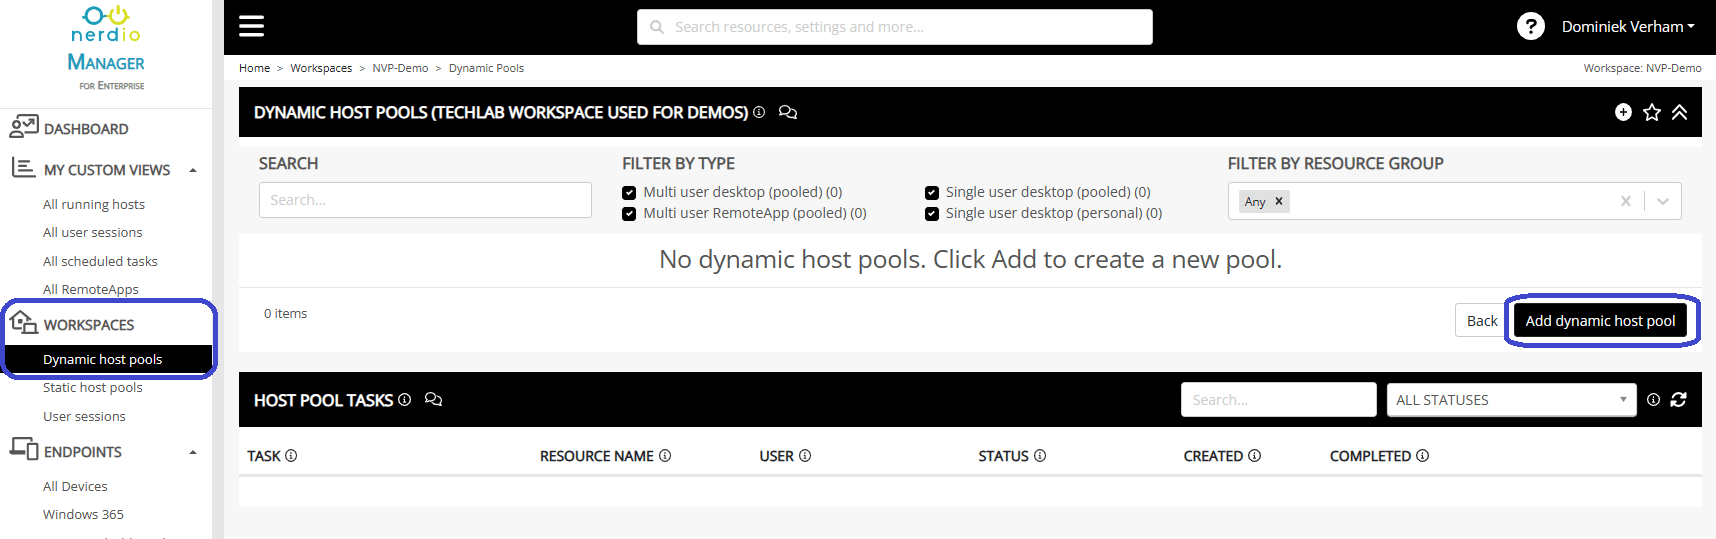
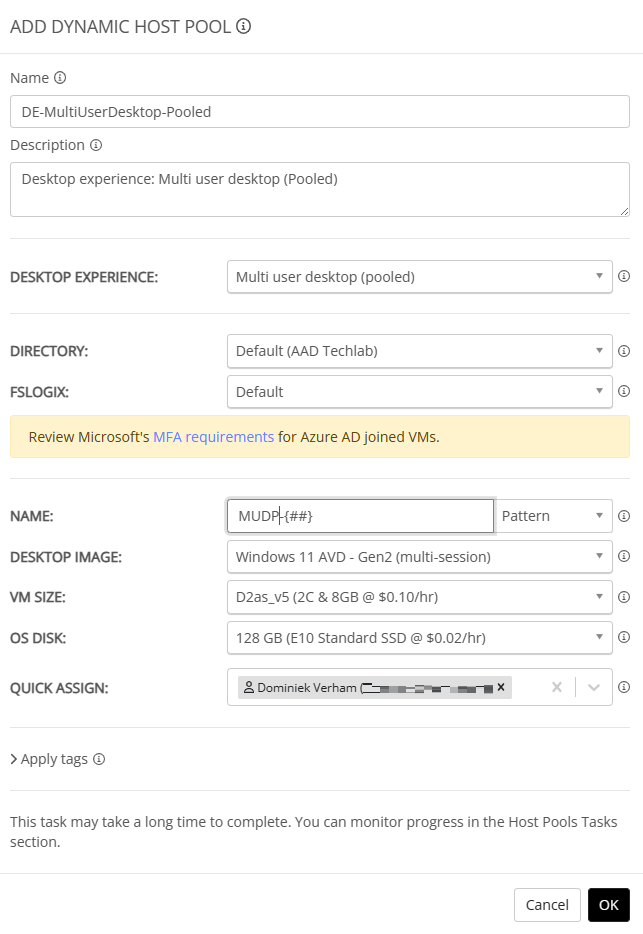
I’ll create a host pool for each type and show the autoscaling features each type has. To create a host pool, go to Workspaces, open up the workspace you’ve already prepared. Click the Add dynamic host pool button to get started.
In the following screen you can click on the down arrow and select the desktop experience that you want;
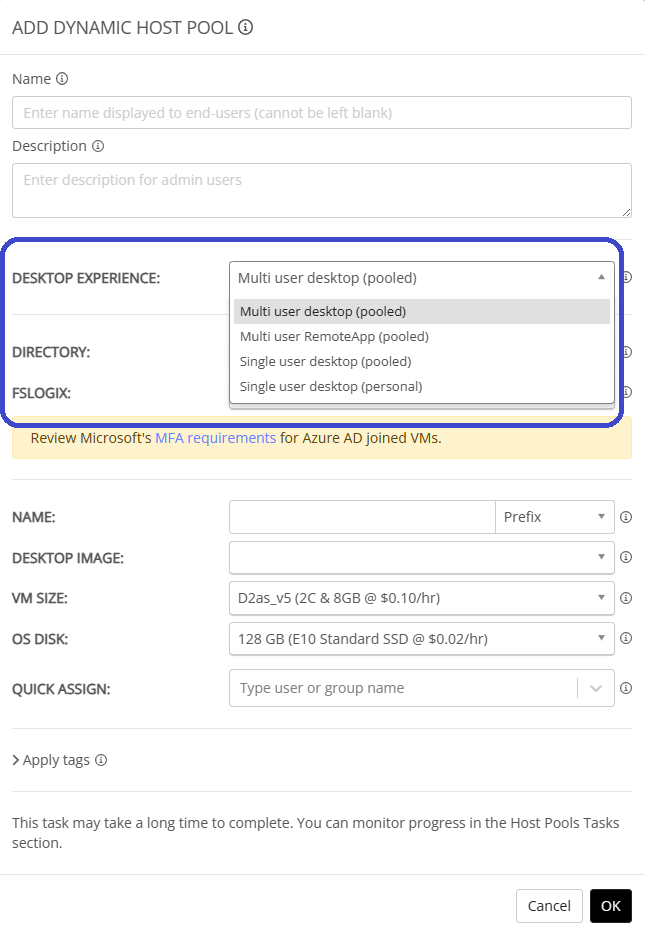
Here’s an example what I ended up with for this demo;
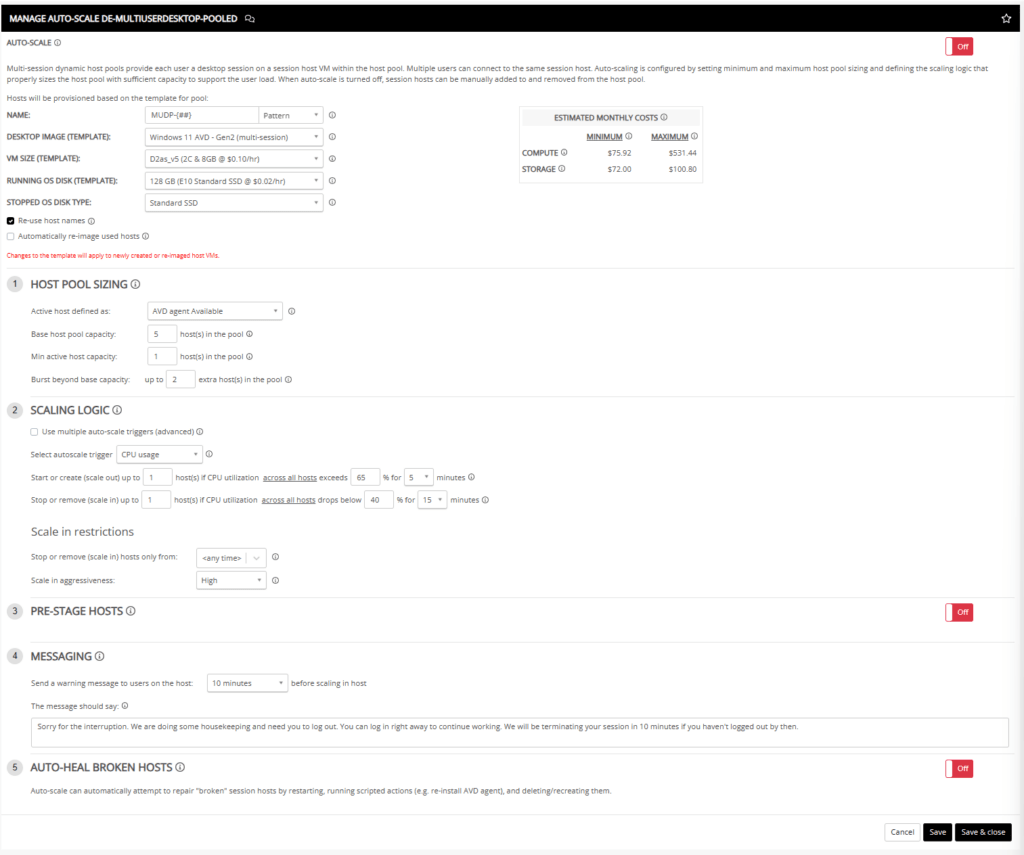
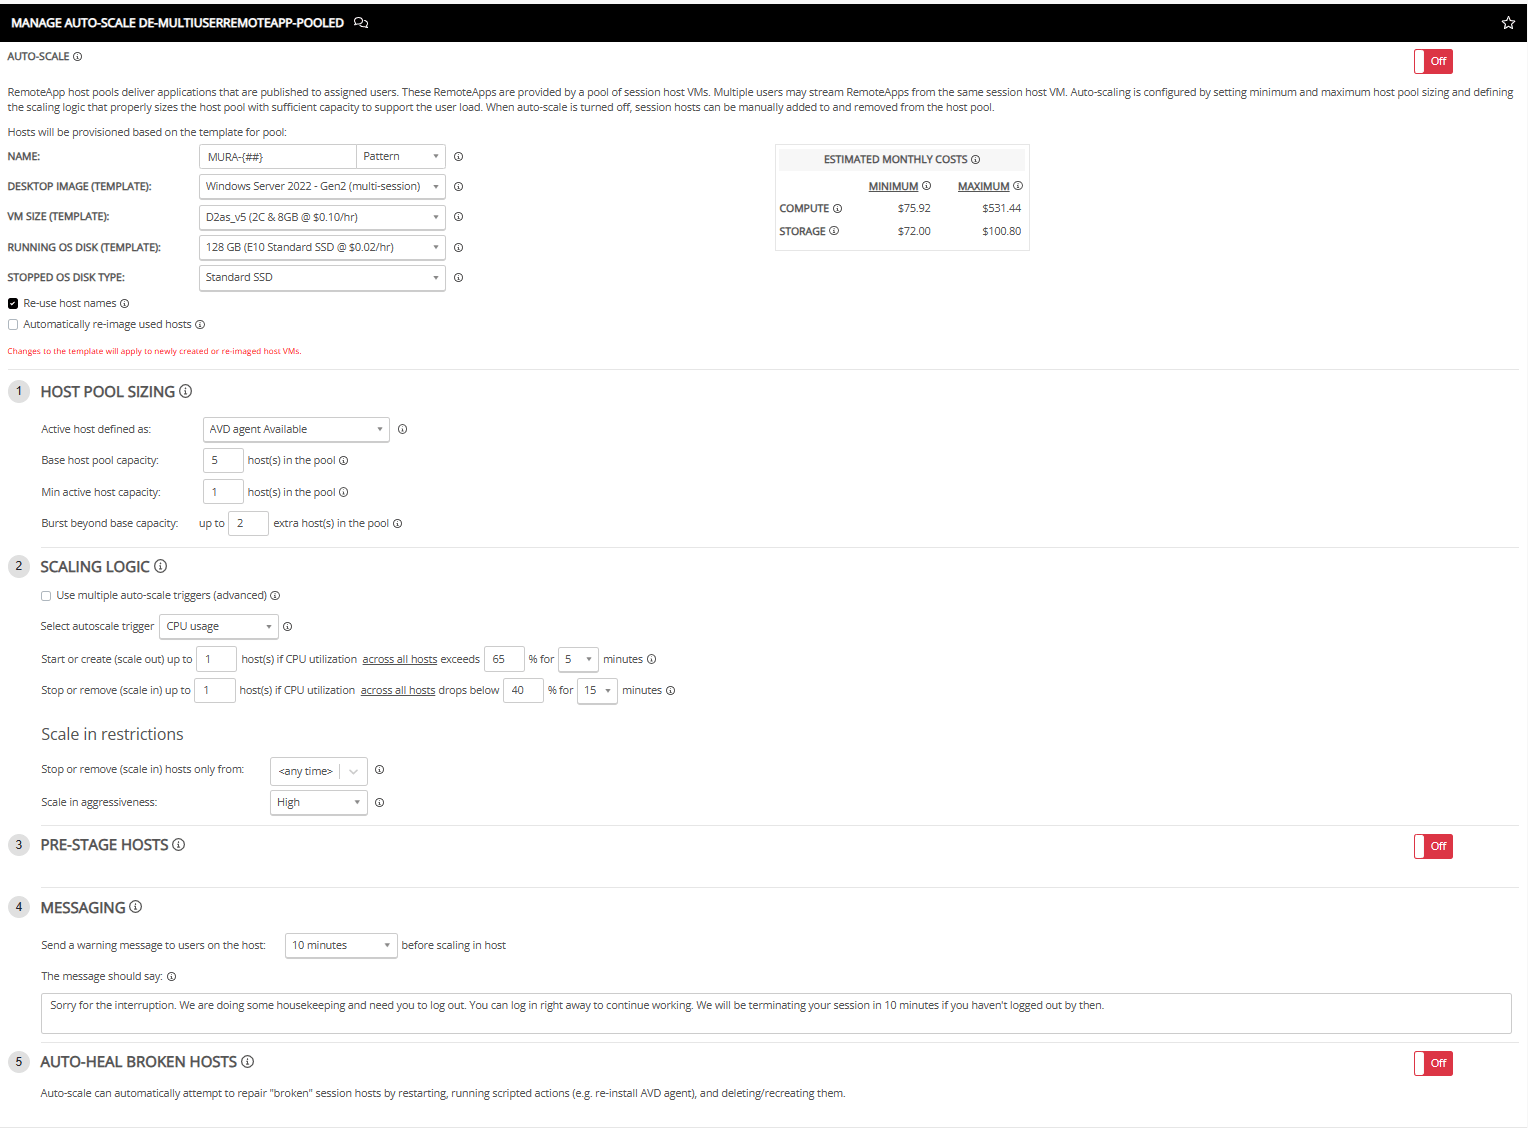
The next step is to setup and configure the autoscale feature. There are a couple of steps that we can configure. They are;
- Some overall settings
- Host pool sizing
- Scaling logic
- Pre-stage hosts
- Messaging
- Auto-heal broken hosts

Did you notice the red sliders on the right side of the screen? They are used to enable autoscaling or separate features, like pre-stage hosts or Auto-heal broken hosts.
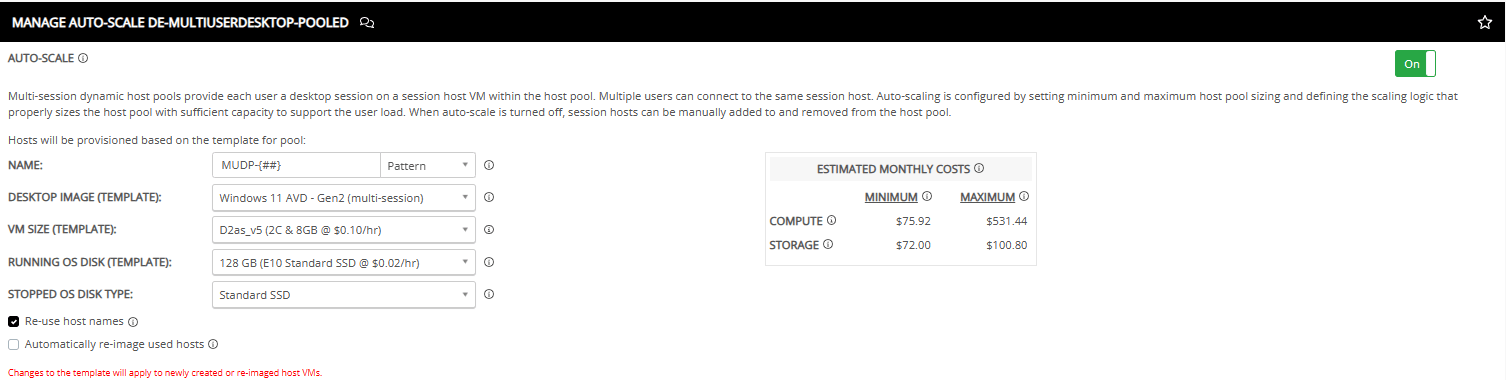
First we can enable Autoscaling by sliding the the first slider to on. You can edit the name to your liking based on a pattern or a prefix. Select your desktop image and VM size and the stopped OS disk type. Finish up by deciding if you want to re-use host names or automatically re-image used hosts.
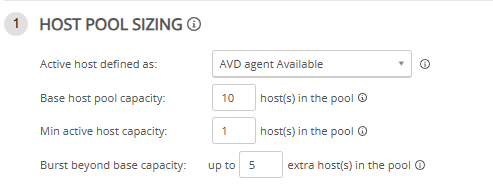
Host pool sizing
In this section we can configure autoscale settings that relate to sizing of the host pool.
- Active host defined as;
- So how do you determine that a host is active? The default is that the AVD agent is available but you can also select VM started.
- Base host pool capacity;
- Configure the number of hosts in the pool. They can be running or stopped.
- Min active host capacity;
- Select the minimum number of running host. They will be running at all time.
- Burst beyond base capacity;
- Add a number of session hosts above the base host pool capacity. This will provide extra capacity if needed.
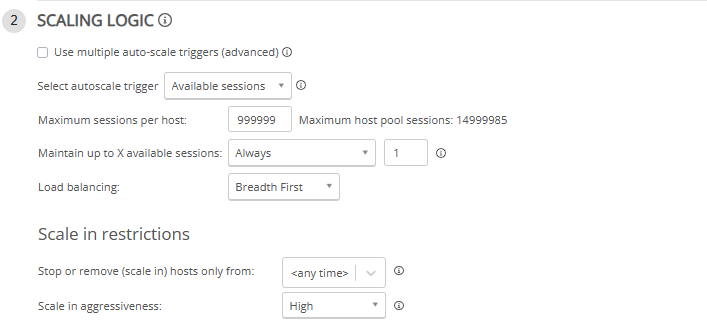
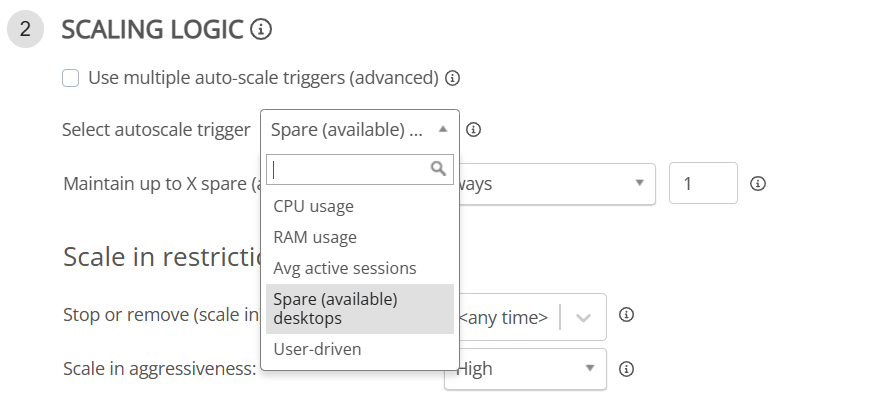
Scaling logic
When does the environment need to scale out or scale in? This is done using triggers. Admins can select up to three triggers. The available triggers are:
- CPU usage
- RAM usage
- Average active sessions
- Available sessions
- User-driven
Keep in mind that a trigger, if selected, will be used for scaling in and scaling out.
Select the checkbox for Use multiple auto-scale triggers if you want to configure more than one. In this case you can mix-and-match CPU usage, RAM usage and Average active sessions. You cannot mix-and-match Available sessions and User-driven.
Here’s an example where I added three triggers. Click on the image for a larger image. You’ll see the grey plus or minus sign on the righthand side next to each trigger:

Use the available sessions trigger if you want autoscale based on the number of sessions per host;
Here’s, here’s an example of User-driven:
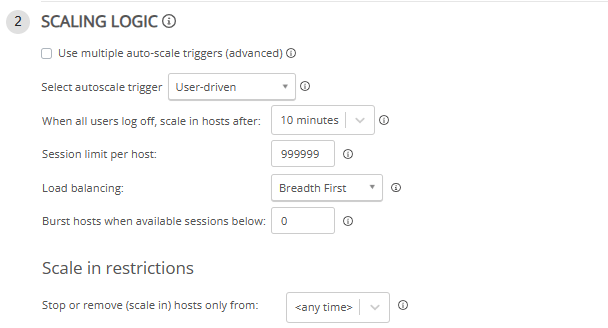
Did you notice scale in aggressiveness? The scale in aggressiveness is available for every trigger, except for User-driven.
But what does this setting do? And what are the differences?
With a big thank you to Toby Skerritt for pointing out that the tooltip actually changes when you select a different value.
Admins choose between high, medium and low. Here is an overview with the tooltip explanation;
- High
- Auto-scale proces will first look for hosts without any sessions and scale those in. Once only hosts with sessions remain, those with the smallest number of active ssions will be scaled in first after notifying users and waiting per configuration below.
- Medium
- Auto-scale process will first look for hosts without any sessions and scale those in. If hosts do not hav active sessions (only disconnected) those will be scaled in. Once only hosts with active sessions remain, the scale in process will not scale them in.
- Low
- Auto-scale process will first look for hosts without any sessions and scale those in. Once only hosts with sessions (both active and/or disconnected) remain, the scale in process will not scale them in.
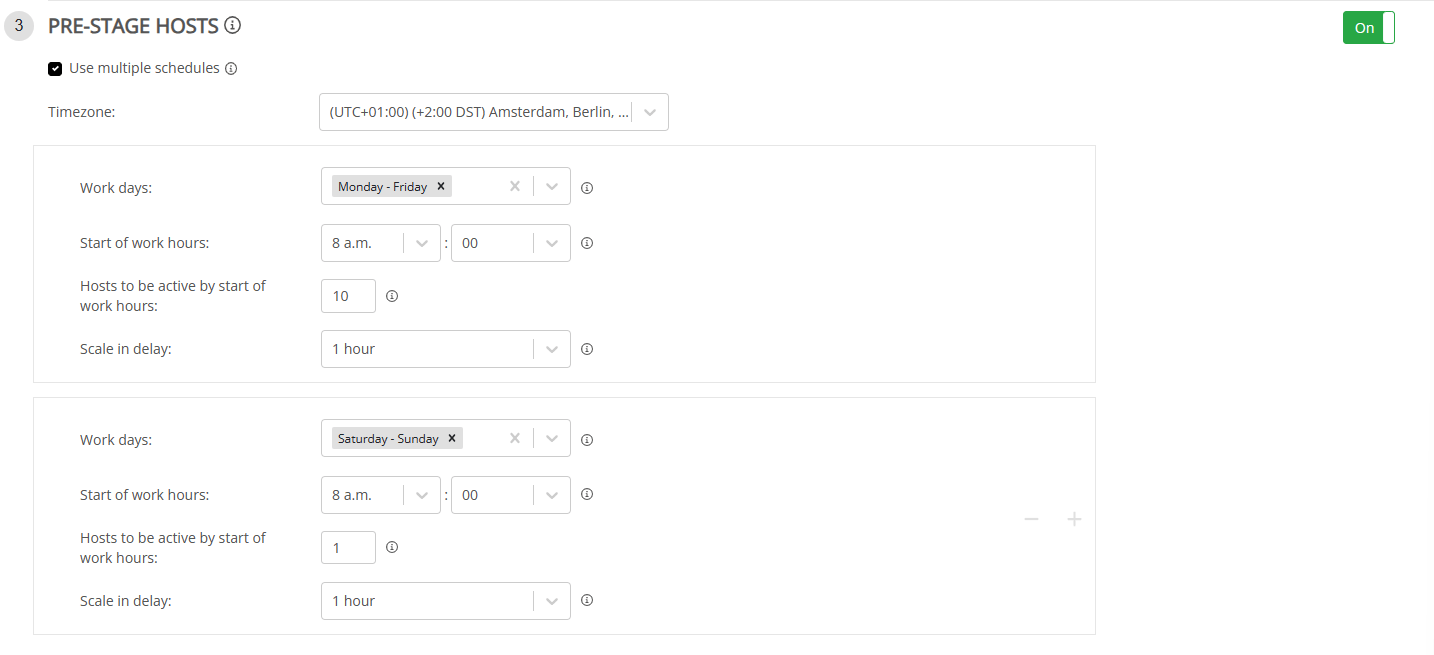
Pre-stage hosts
Pre-staging hosts is an optional step. Use this to prevent a logon storm by adding capacity before the bulk of your users sign in at the same time in the morning. Make sure to slide the button to On and you’re all set to configure the options.
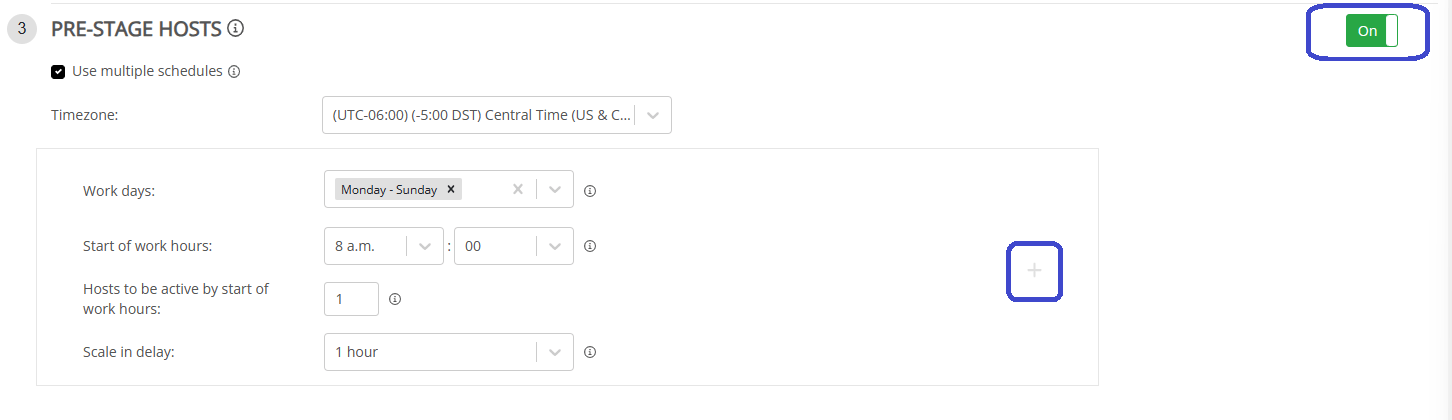
Here’s an example of what pre-staging could like like with a monday to friday schedule and a schedule for the weekend. The numbers in this screenshot are just for demo purposes;
Messaging
Admins can specify a message that users will see before the scaling in process starts. Just configure the message and the time interval.

We have arrived at the final and second optional step to configure autoscaling.
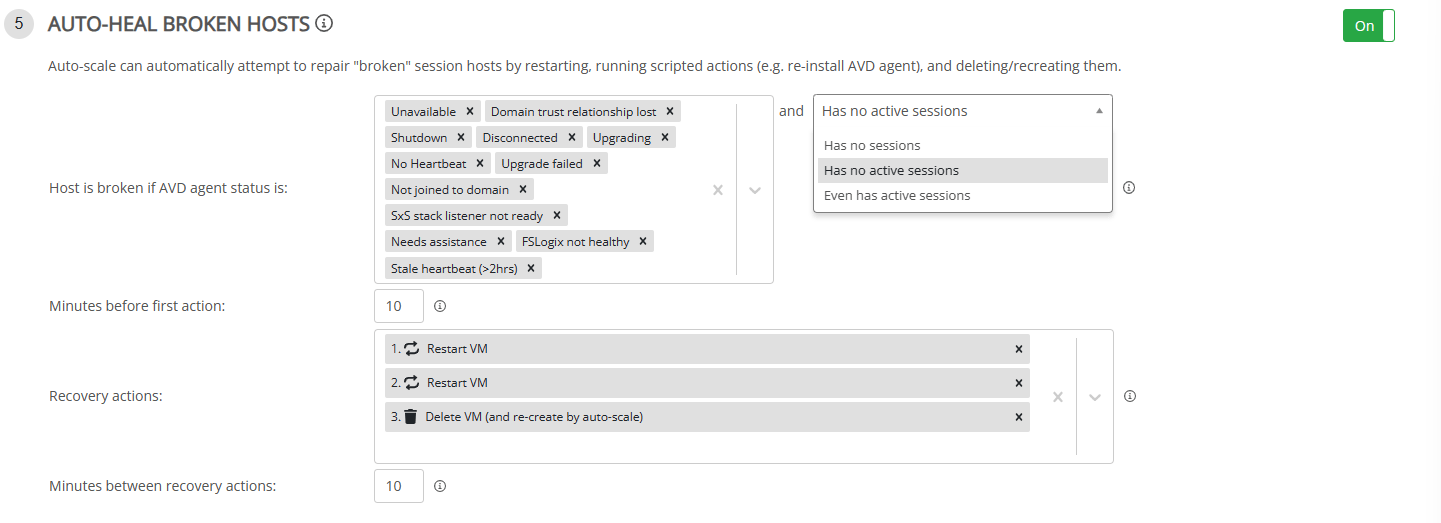
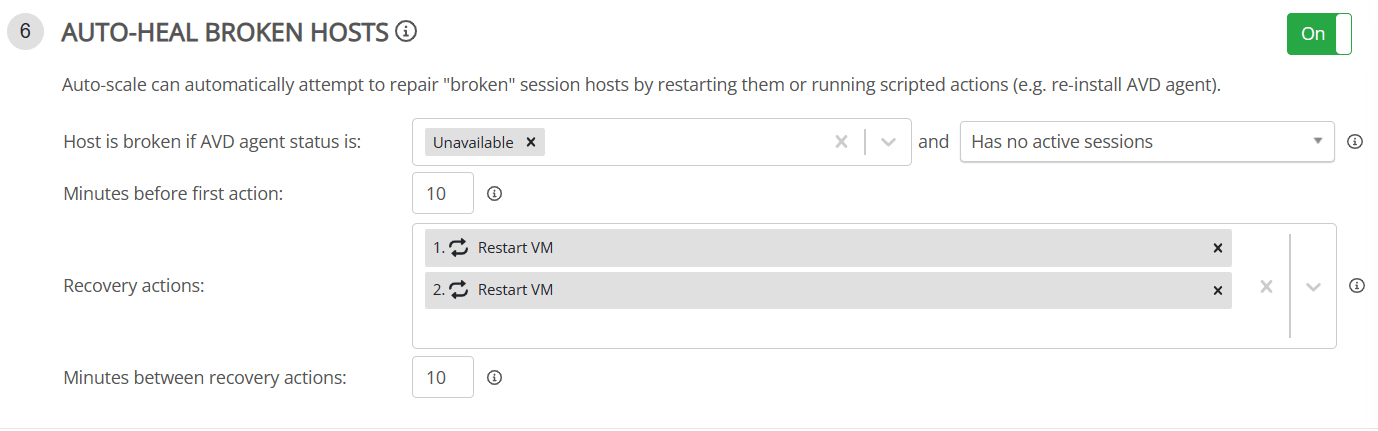
Auto-heal broken hosts
Use this step to automatically repair broken hosts. Imagine that you have 10 session hosts in your host pool, but three of them do not accept any new connections. That does have an undesired impact, doesn’t it? Here’s what Nerdio can do to fix that.
Define when you want Nerdio to consider that a session host is broken. You can mix-and-match a number of statusses for the AVD client and filter if the host has no sessions, no active sessions or even has active sessions.
Next you can specify the time in minutes before NME will try to repair the host and define a sequence of recovery actions.
Finish up by defining a time between recovery actions.
The following screenshot has all the AVD agent statusses that you can choose;
Remember that the autoscale feature will begin once you hit the save or save & close button.
If you want to save your awesome work but don’t want that the autoscale feature kicks in immediately, then make sure to slide the auto-scale toggle to Off and then save the settings.
Multi user RemoteApp (Pooled) auto-scale options
I won’t go through all the steps of configuring separate host pools for each desktop experience since we already discussed that. Instead let’s fast forward to the autoscaling options! In the following screenshot we can see that the options are the same as we saw in the Multi user desktop (Pooled) desktop experience.
Single user desktop (Pooled) autoscale options
If you’re configuring this type of desktop experience, you will see some differences in the autoscale options. The first two steps (Generic settings and Host pool sizing) are still the same.
Scaling logic
We have the same triggers as mentioned before, but there’s an addition here called Spare (available) desktops. NME will automatically calculate the available session desktop capacity and try to main the specified number of desktops if selected.
Other options are the same as mentioned before.
Single user desktop (Personal) autoscale options
We’ve arrived at the final desktop experience; the single user desktop (personal) option. Autoscaling looks a bit different as we’ve seen before. The steps are:
- Auto-scale mode
- Desktop start and stop
- Pre-stage host OS disk
- Auto-grow
- Auto-shrink
- Auto-heal broken hosts
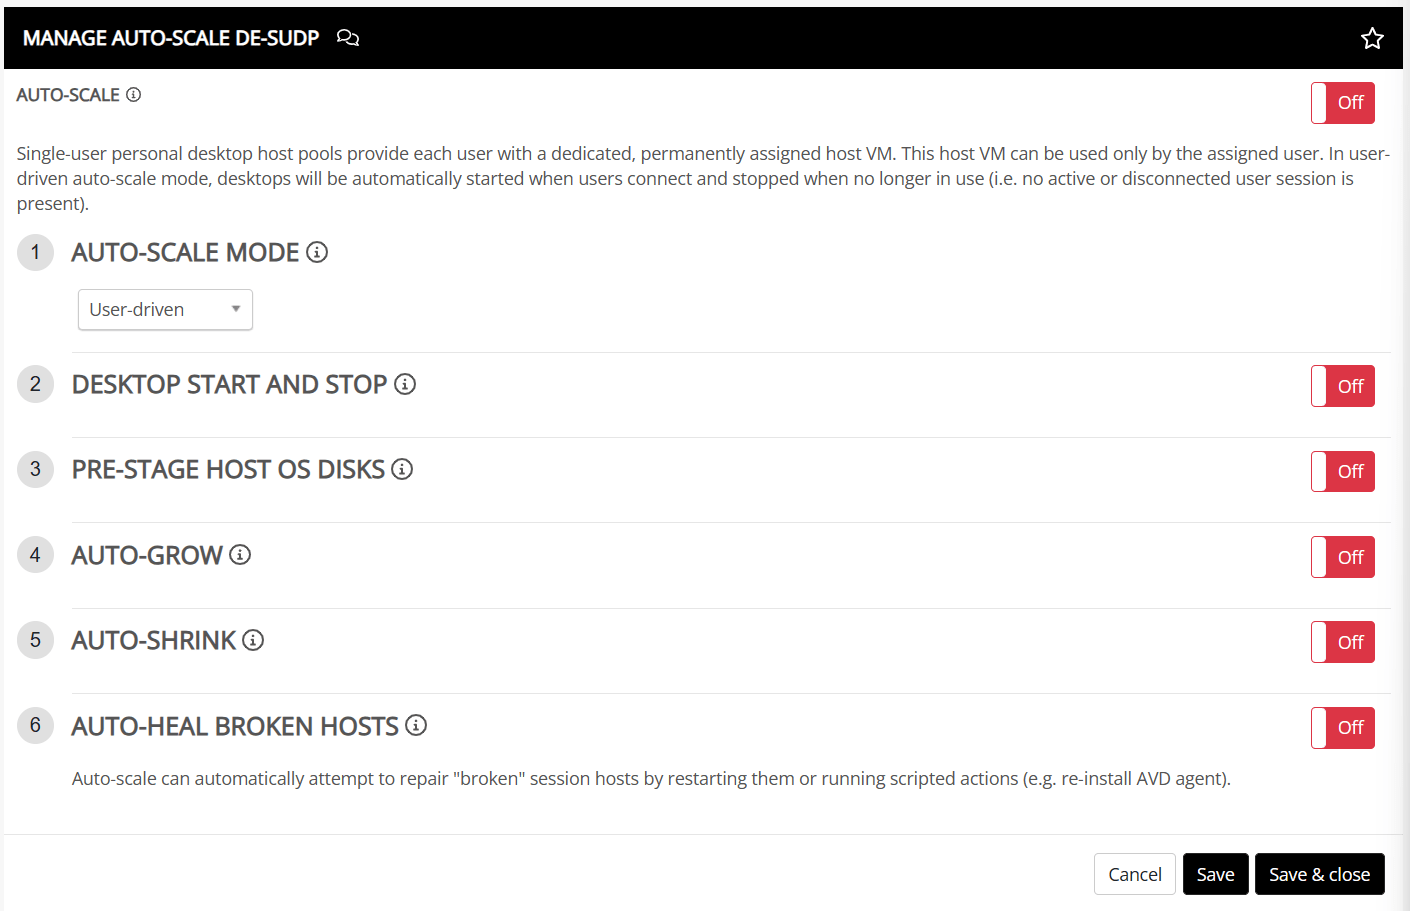
As you can see, by default all options are set to Off.
Auto-scale mode
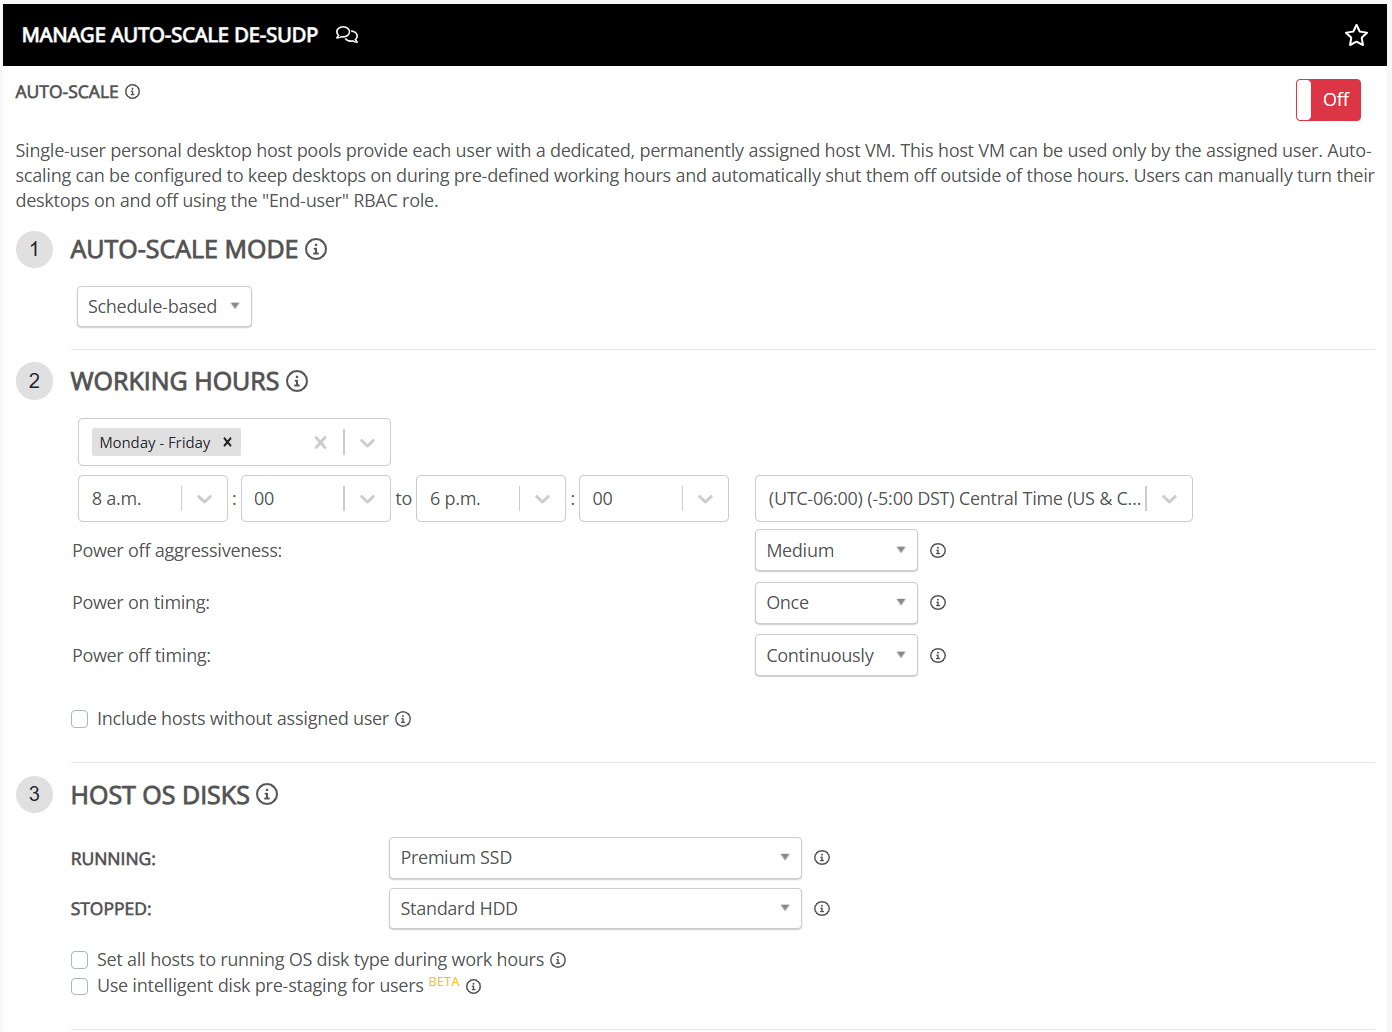
The auto-scale mode can be set to schedule-based or user-driven. The default option is user-driven which is used if you want to power on desktops once users log in. You can switch to schedule-based and configure a schedule as you like.
You’ll see some things change if you go for schedule-based. Desktop start and stop and pre-stage host OS disk are replaced by working hours and host OS disk.
Back to user-driven autoscale mode! Let’s have a look at;
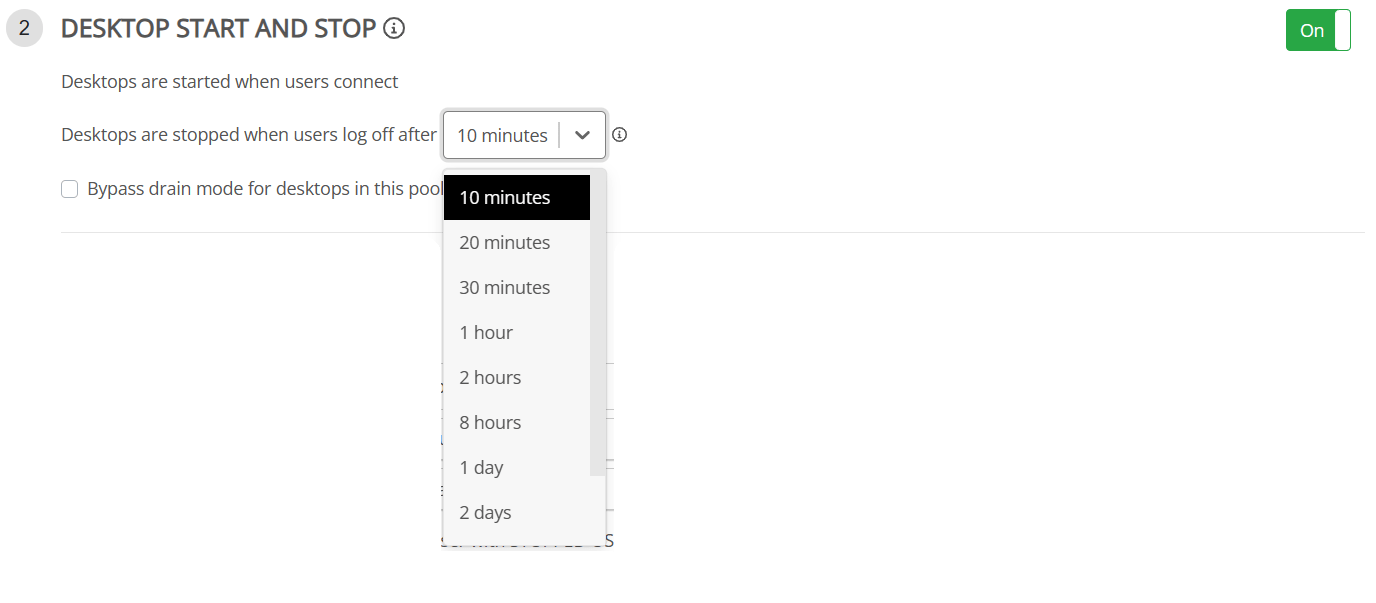
Desktop start and stop
Make sure to flip the switch to On so you can configure the option. Desktops will start automatically once users connect. You can configure a time period in minutes when the desktops will be stopped once the users log off.
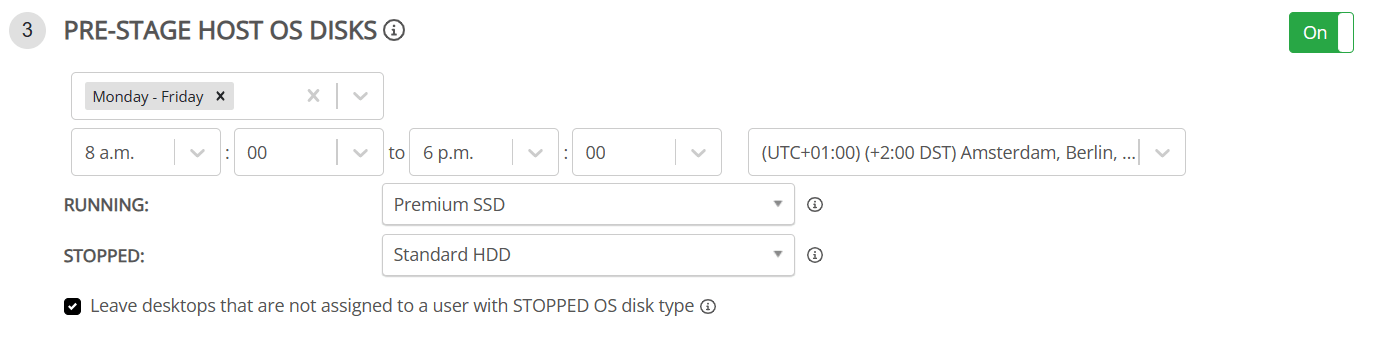
Pre-stage host OS disk
You want to use premium SSD disks for your session hosts for best performance. But premium disks costs more than standard HDDs. So it makes sense to use premium SSDs during working hours and convert the disks back to HDD outside of working hours. That’s exactly what this step does. You can create your own schedule and use it to save money!
Auto-grow
In this section you can specify what happens when you are running out of unassigned desktops.
Just specify the number of minimum available desktops (or switch to a percentage if you are a math genious) and define the name, desktop image, VM size and OS disk.

Auto-shrink
You probably don’t want to have desktops that have not been in use for a long time. You guessed it, use this section to define what a long time is and select the options for desktops that should be removed.

The last step in the process is called Auto-heal broken hosts.
This works the same as in the other desktop experiences.
Remember that you can always configure Autoscaling and set it to Off. This way the settings are configured but you can edit them later without the feature being active.
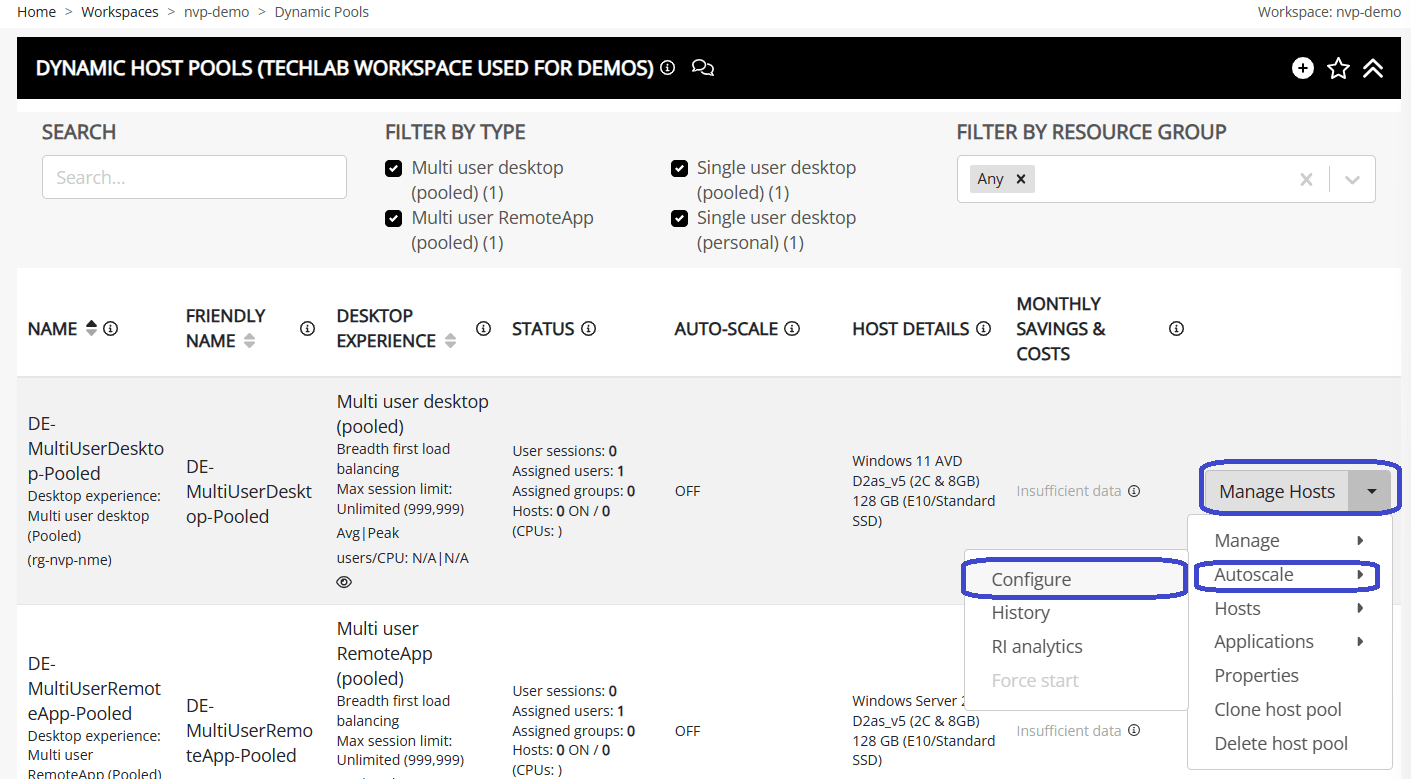
If you want to edit the existing autoscale settings, just head over to Workspaces, Dynamic Host Pools, click the down arrow next to the host pool, Autoscale, Configure.
Other options you’ll find here are:
- History: If autoscaling is enabled, you’ll find a nice historical overview of the actions that were performed by the autoscaler.
- RI analytics: Nerdio can help you to determine to select the right amount of reserved instances. Use this analytics tool to find out more.