Hi everyone and welcome to the second post about shell apps, a part of Nerdios Unified Application Management ecosystem that allows applications to be detected, installed and uninstalled by using Powershell. You can find the introduction to Shell apps in the first post: which you can read here.
In this post I’ll dig a bit deeper into the detection, installation and uninstallation scripts to hopefully help you get started with Shell apps.
Also I wonder if you get all of the jokes in the header of this post, or that I am getting old 🙂
Disclaimer: this has become a lenghty post since it contains Powershell scripts. You might want to grab a coffee before you start!
Prerequisites
You should know that Shell apps are currently supported for Personal AVD Desktops and Pooled AVD Hosts pools. Intune managed devices such as physical desktops or Cloud PCs are not supported even though Nerdio does have plans for that.
Make sure that Powershell remoting is enabled: use Enable-PSremoting command for that.
How to create a shell app
You can create a shell app from Applications, Shell Apps. Click the Add button to get started:
This will bring you to the following screen:
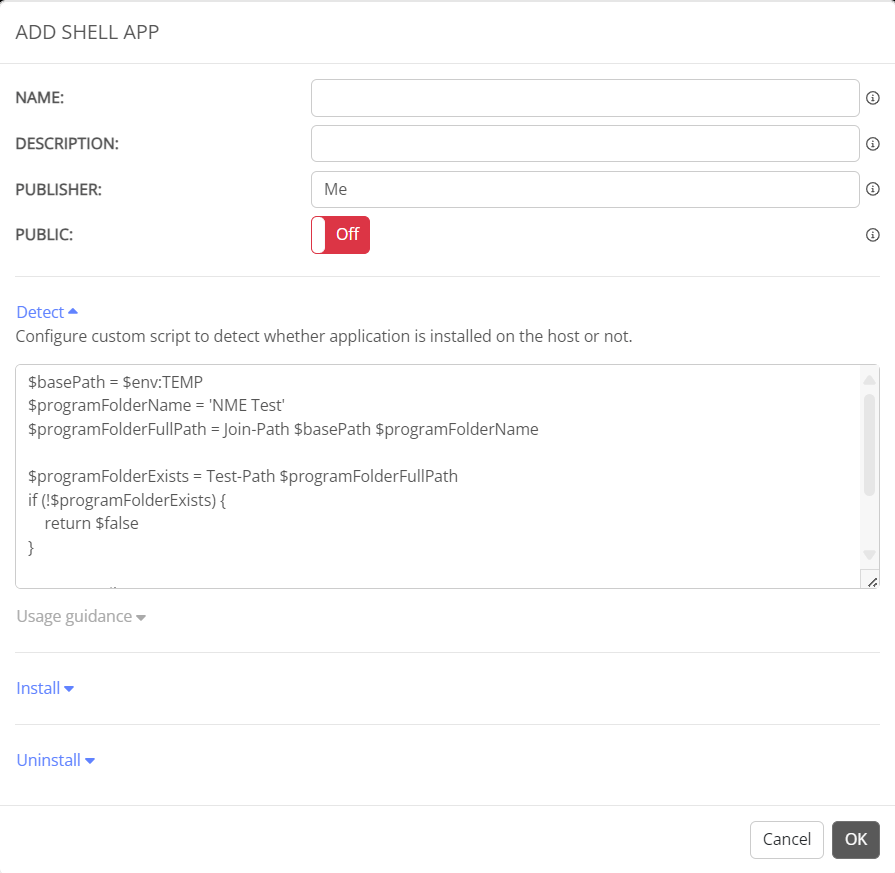
All we need to do here is to enter a:
- Name
- Description
- Publisher
- Optionally: toggle the switch to ON to publish the shell app to the Unified Catalog
Shell apps are managed using Powershell.In case you are new to Powershell; Don’t be afraid of Powershell! As Harm Veenstra tends to say “Powershell is fun!”.
There are three scripts that we need to configure for the shell to work:
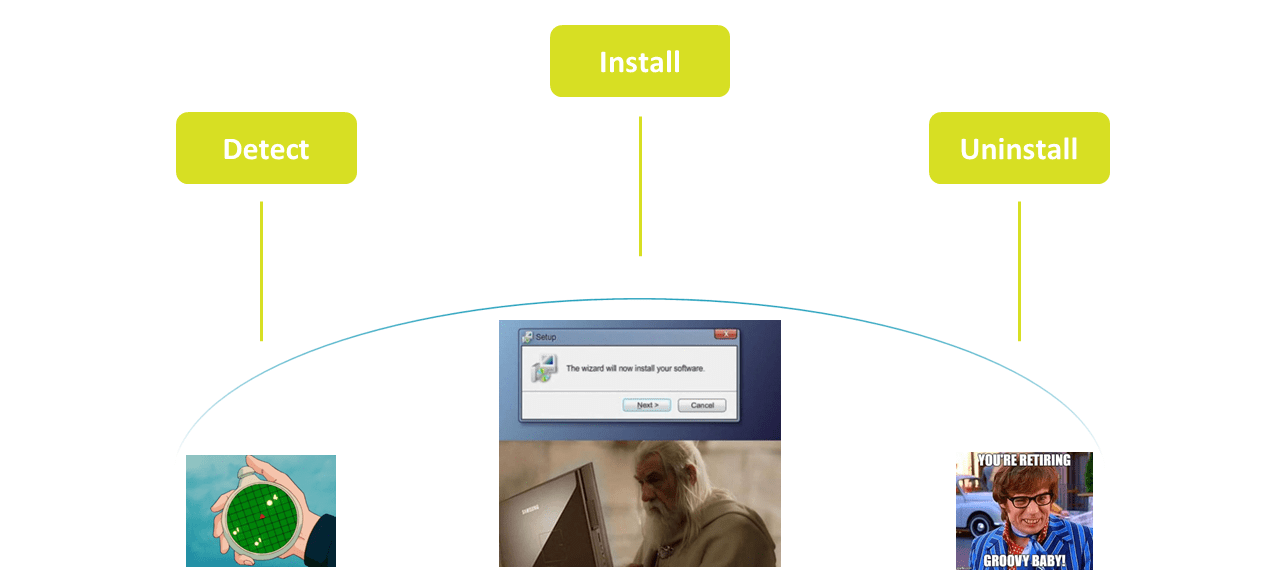
The legends at Nerdio already provided an example script for each step we can use to get started. Let’s have a look at the detection script:
Detection script
The goal
A detection script is used to determine if an application is present on a desktop. If you work with Microsoft Intune, you could compare this to the detection rule step.
Let’s take a look at the example script:
$basePath = $env:TEMP
$programFolderName = 'NME Test'
$programFolderFullPath = Join-Path $basePath $programFolderName

$programFolderExists = Test-Path $programFolderFullPath
if (!$programFolderExists) {
    return $false
}

$programFileName = 'app.txt'
$programFileFullPath = Join-Path $programFolderFullPath $programFileName

return Test-Path $programFileFullPath
The script will try to find the path and the executable. If it’s found then NME will assume that the app is installed. If they are not found, NME will assume the app is not installed.
I feel like there are two approaches to this. You can either change the content of a couple of variables, such as basePath, programFolderName and programFileName. This is a quick and efficient to determine if an app is present. Or you can go all out depending on the application and customizations that need to be done. For most of the apps I would suggest to keep it simple.
When would you use a custom script?
You could choose to implement some remediation steps in the installation script. Let’s discuss an example. What if the steps to install an application are:
- Install the application
- Create a custom folder
- Place a file into the new folder (a license file for example)
What if the file is not placed into the custom folder? In this case the detection script would detect the installation folder and the executable. NME would assume the app is installed correctly. But the app would not work like it should since the file is not available in the custom folder.
In this case you could get a bit more creative. You could write a detection script that would detect defaults like installation folder and executable. Then I would suggest to check for the custom folder and the custom file. If all are present then it is installed correctly. However if one should fail, such as the custom file, then the detection script should fail.
NME would try to install the application using the installation script. You have the option to customize the installation script as well. In this particular case I would suggest to detect each step and skip that step if it’s present. So in this case I would customize the script as follows:
- Detect the installation path and executable. If not present, run the installation part of the script and continue to the second step.
- Detect the custom folder. If not present, run the part of the script that creates the folder and continue to the third step.
- Detect the custom file. If not present, run the part of the script that downloads the custom file and save it in the custom folder.
The uninstall script should be configured to detect each step and perform a cleanup if the content is detected.
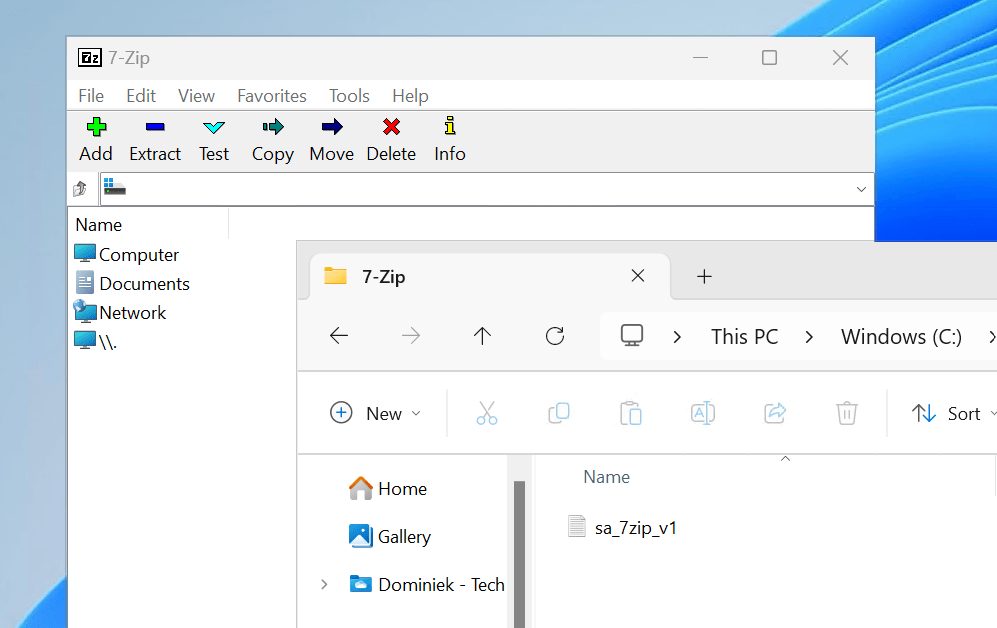
I think it’s time for a demo! Let’s try to install an application like 7zip and let’s assume that we need a custom folder (C:\Temp\7zip) and create a custom file (sa_7zip_v1.txt).
Basic detection script
I changed the values for the following variables:
- basePath: it now points to C:\Program Files.
- programFolderName: the folder that 7Zip uses is 7-Zip.
- programFileName: the executable to start 7Zip is 7zFM.exe.
- Result: the script will try to detect “C:\Program Files\7-Zip\7zFM.exe”.
$basePath = $env:programfiles
$programFolderName = '7-Zip'
$programFolderFullPath = Join-Path $basePath $programFolderName

$programFolderExists = Test-Path $programFolderFullPath
if (!$programFolderExists) {
    return $false
}

$programFileName = '7zFM.exe'
$programFileFullPath = Join-Path $programFolderFullPath $programFileName

return Test-Path $programFileFullPath
Custom detection script
Let’s have some fun with Powershell and create a custom detection script and perform a check for each step. NME will expect a result of true or false:
- Detect the installation path. We continue to the next step if the path exist or return the value false if the check fails.
- Detect the installation path and executable. We join the installation path and the filename of the executable and then we check for it’s existance. If it exist, we continue to the next check. If the check fails, we return the value false.
- Detect the custom folder. We check if the custom folder exists. We continue to the next check if it exists and return the value false if it does not.
- Detect the custom file. We check if the custom file is in place. We will end the checks and return the value true if the file is detected. If not, we will return the value false.
# Step 1: Detect the installation path
$basePath = $env:programfiles
$programFolderName = '7-Zip'
$programFolderFullPath = Join-Path $basePath $programFolderName

$programFolderExists = Test-Path $programFolderFullPath
if (!$programFolderExists) {
    return $false
}

# Step 2: Detect the installation path and executable
$programFileName = '7zFM.exe'
$programFileFullPath = Join-Path $programFolderFullPath $programFileName

$programFileFullPathExists = Test-Path $programFolderFullPath
if (!$programFolderExists) {
    return $false
}

# Step 3: Detect the custom folder
$tempFolder = "C:\Temp"
$tempFolderExists = Test-Path $tempFolder
if (!$tempFolderExists) {
    return $false
}

$customFolder = $tempFolder + "\7-Zip"
$tempFolderExists = Test-Path $tempFolder
if (!$tempFolderExists) {
    return $false
}

# Step 4: Detect the custom file
$customFileName = "sa_7zip_v1.txt"
$customFileLocation = Join-Path $tempFolder $customFileName
$customFileLocationExists = Test-Path $customFileLocation
if (!$customFileLocationExists) {
    return $false
}

# We have to return $true since each check simply returns $false if a check fails
return $true
Just paste the script that you just created and tested on a VM into the Detect section of the Shell app.
Installation script
The goal
NME will use this script to install the application. I would suggest to stick to the example script to keep things simple, but then again if you are looking at Shell apps it probably means that a simple installation is out of the question 🙂
Let’s see what the example script by Nerdio looks like:
$basePath = $env:TEMP
$installerFolderName = "Notepad $(New-Guid)"
$installerFolderFullPath = Join-Path $basePath $installerFolderName

$installerFolderExists = Test-Path $installerFolderFullPath
if ($installerFolderExists) {
Remove-Item $installerFolderFullPath -Recurse -Force -ErrorAction Stop
}

New-Item -Path $basePath -Name $installerFolderName -ItemType Directory -Force | Out-Null
$installerName = 'installer.exe'
$installerFullPath = Join-Path $installerFolderFullPath $installerName

$installerUrl = "https://github.com/notepad-plus-plus/notepad-plus-plus/releases/download/v8.6/npp.8.6.Installer.x64.exe"
Invoke-WebRequest -URI $installerUrl -OutFile $installerFullPath

Start-Process "$installerFullPath" -Wait -ArgumentList "/S"

Remove-Item $installerFolderFullPath -Recurse -Force

$Context.Log('Install script completed')
Basic installation script
I changed the values for the following variables:
- installerFolderName: changed to 7Zip. Nerdio already added code to add a GUID to ensure this path is unique.
- installerName: changed the value to the match the name of the installation file.
- installerURL: Changed to URL to the correct download URL. Locating the URL is simple of course. Just open up a browser, search for the download. Once at the download link, rightclick and select Copy link.
- Result: the script will construct an installation folder. It will check if that folder already exists. If so, it will delete the folder and everything in it. It will construct an installation path using the unique path and the name of the installation file. Next up it will try to download the file and save it in the unique installation path prepared earlier. It will try to install the application and it will cleanup the installation file after installation.
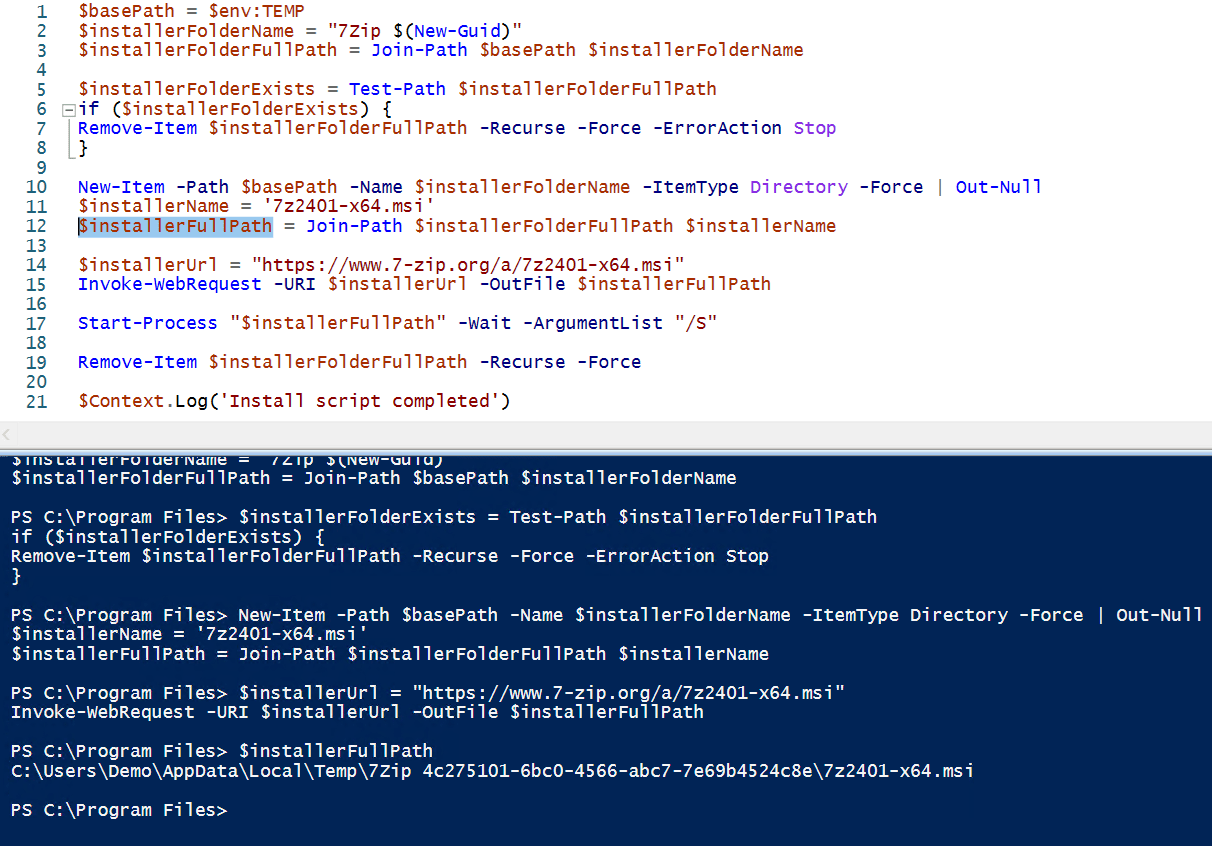
In this case I ran into an issue where msiexec just send out a basic prompt telling me how to run the command correctly. And the reason why was staring me in the face the entire time… When Nerdio created the unique folder, it incorporated a space into the folder name. Powershell doesn’t like that and the script will fail.
Now I have to look like I’m smart and fix it in a cool way. So one coffee later I thought why not get all of the parameters in a custom object and make sure that the installation path has some quotes around it. I ended up with something like this:
From here on out it was smooth sailing. The app was installed and the cleanup finished the job. The script I ended up with looks like this:
$basePath = $env:TEMP
$installerFolderName = "7Zip $(New-Guid)"
$installerFolderFullPath = Join-Path $basePath $installerFolderName
$installerFolderExists = Test-Path $installerFolderFullPath
if ($installerFolderExists) {
Remove-Item $installerFolderFullPath -Recurse -Force -ErrorAction Stop
}
New-Item -Path $basePath -Name $installerFolderName -ItemType Directory -Force | Out-Null
$installerName = '7z2401-x64.msi'
$installerFullPath = Join-Path $installerFolderFullPath $installerName
$installerUrl = "https://www.7-zip.org/a/7z2401-x64.msi"
Invoke-WebRequest -URI $installerUrl -OutFile $installerFullPath
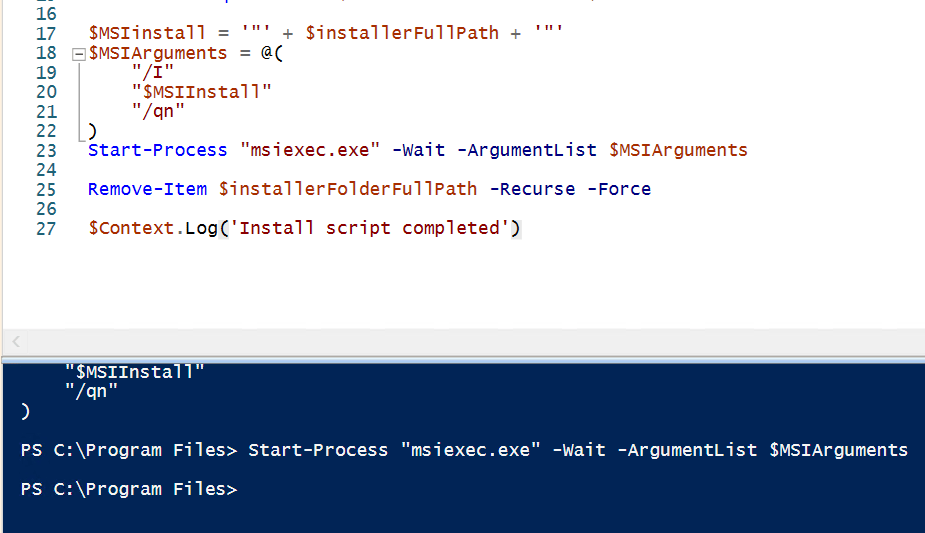
$MSIinstall = '"' + $installerFullPath + '"'
$MSIArguments = @(
"/I"
"$MSIInstall"
"/qn"
)
Start-Process "msiexec.exe" -Wait -ArgumentList $MSIArguments
Remove-Item $installerFolderFullPath -Recurse -Force
$Context.Log('Install script completed')Is everyone still with me? Good! Bear with me as we continue with:
Custom installation script
So we already got things ready to install, but for the demo we still need to create a custom folder and add a custom file to it. I ended up with the following scripts (see below) and it does the following:
- It detects if the app is installed and it will install the app if it’s not found.
- It detects if the custom folder (C:\Temp\7-Zip) is found and it will create it if it’s found.
- It detects if the custom file (sa_7zip_v1.txt) is found in the custom folder. If not, it will create it.
By implementing a check for each step, you only perform the installation tasks that are needed.
# Step 1.1: Detect if we need to install the app
$appInstallNeeded = $false
$basePath = $env:programfiles
$programFolderName = '7-Zip'
$programFolderFullPath = Join-Path $basePath $programFolderName
$programFileName = '7zFM.exe'
$programFileFullPath = Join-Path $programFolderFullPath $programFileName

$programFileFullPathExists = Test-Path $programFolderFullPath
if (!$programFileFullPathExists) {
    $appInstallNeeded = $true
}

# Step 1.2: Install the app because it was not detected
if ($appInstallNeeded -eq "false"){
	$basePath = $env:TEMP
	$installerFolderName = "7Zip $(New-Guid)"
	$installerFolderFullPath = Join-Path $basePath $installerFolderName

	$installerFolderExists = Test-Path $installerFolderFullPath
	if ($installerFolderExists) {
	Remove-Item $installerFolderFullPath -Recurse -Force -ErrorAction Stop
	}

	New-Item -Path $basePath -Name $installerFolderName -ItemType Directory -Force | Out-Null
	$installerName = '7z2401-x64.msi'
	$installerFullPath = Join-Path $installerFolderFullPath $installerName

	$installerUrl = "https://www.7-zip.org/a/7z2401-x64.msi"
	Invoke-WebRequest -URI $installerUrl -OutFile $installerFullPath

	$MSIinstall = '"' + $installerFullPath + '"'
	$MSIArguments = @(
		"/I"
		"$MSIInstall"
		"/qn"
	)
	Start-Process "msiexec.exe" -Wait -ArgumentList $MSIArguments

	Remove-Item $installerFolderFullPath -Recurse -Force
}

# Step 2: Detect if we need to create the custom folder
$custom7zipExists = Test-Path "C:\Temp\7-Zip"
if (!$custom7zipExists) {$null = New-Item -ItemType Directory -Path "C:\Temp\7-Zip"}

# Step 3: Detect if we need to create the custom file
$custom7zipExists = Test-Path "C:\Temp\7-Zip\sa_7zip_v1.txt"
if (!$custom7zipExists) {$null = New-Item -Path "C:\Temp\7-Zip" -ItemType File  -Name "sa_7zip_v1.txt"}

$Context.Log('Install script completed')
I think the real power of using Shell apps is becoming quite clear now. Having the flexibility to “wrap” the installation in a Powershell script and customize the installation to your needs is a great addition. Well done Nerdio!
Uninstallation script
The goal
… is pretty self explanatory. NME will use this script to uninstall the application. You have the option to add to the script to make sure that other customizations by the installation script are cleaned up as well.
So what does the example script look like?
$basePath = $env:TEMP
$programFolderName = 'NME Test'
$programFolderFullPath = Join-Path $basePath $programFolderName

$programFolderExists = Test-Path $programFolderFullPath
if ($programFolderExists) {
    Remove-Item $programFolderFullPath -Recurse -Force -ErrorAction Stop
}

$Context.Log('Uninstall script completed')
The example script from Nerdio seems to check a folder. If the folder is found, it will automatically delete the folder and it’s content. While this works, this isn’t really the best way to uninstall an application right? I would expect something more along the line of testing if a file exists that is used to uninstall the application. Some apps even have an uninstall file that we can use. Or in the case of an MSI, we can simply use msiexec to uninstall the app. But then again this is an example script, let’s see if we can create our own basic uninstallation script.
In this demo I used an MSI to install 7-Zip. So let’s go down that route. To find out the guid for the installation of 7-Zip, just run the following command:
get-wmiobject Win32_Product | Sort-Object -Property Name |Format-Table IdentifyingNumber, Name, LocalPackage -AutoSizeThis will retrieve all the installed apps and their IDs:

And there you have it. Now we can run the following command to uninstall the app:
msiexec.exe /X 23170F69-40C1-2702-2401-000001000000 /qnAnd this will make sure that the application is uninstalled. Remember that other customizations are not cleaned up!
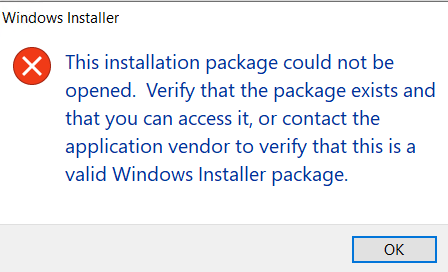
So now we can continue with the custom uninstall script right? Well, no. I have seem to upset the demo gods today because 7-Zip decided throw errors at me.
So we might as well continue to the…
Custom uninstallation script
Let’s reuse what we already have:
- Download the installer (we need that to uninstall 7-Zip).
- Define the parameters to pass to msiexec to uninstall the app.
- Uninstall 7-Zip using the .msi file.
- Cleanup other customizations. Since the custom file is in the custom folder, all I have to do is to remove the folder.
I ended up with the following:
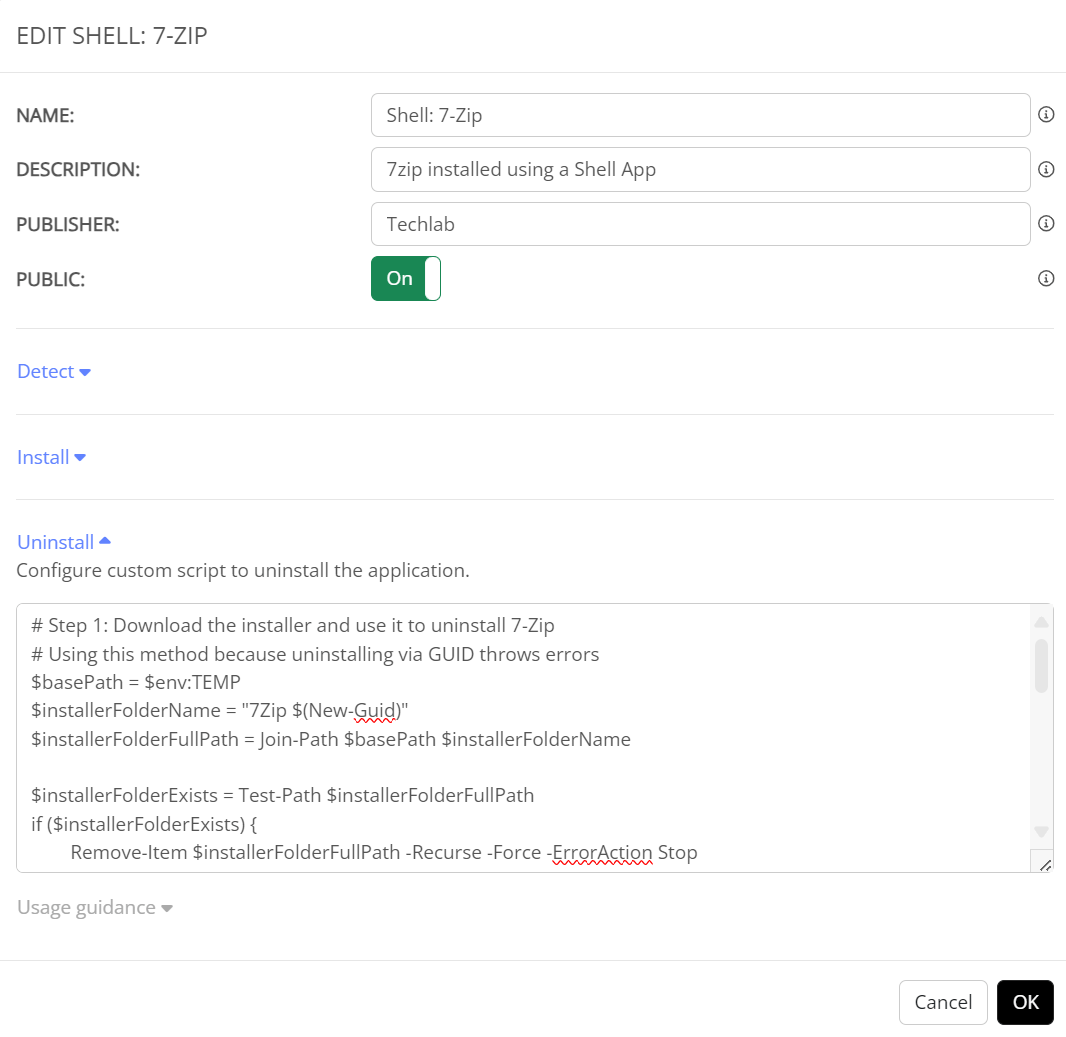
# Step 1: Download the installer and use it to uninstall 7-Zip
# Using this method because uninstalling via GUID throws errors
$basePath = $env:TEMP
$installerFolderName = "7Zip $(New-Guid)"
$installerFolderFullPath = Join-Path $basePath $installerFolderName

$installerFolderExists = Test-Path $installerFolderFullPath
if ($installerFolderExists) {
	Remove-Item $installerFolderFullPath -Recurse -Force -ErrorAction Stop
}

New-Item -Path $basePath -Name $installerFolderName -ItemType Directory -Force | Out-Null
$installerName = '7z2401-x64.msi'
$installerFullPath = Join-Path $installerFolderFullPath $installerName

$installerUrl = "https://www.7-zip.org/a/7z2401-x64.msi"
Invoke-WebRequest -URI $installerUrl -OutFile $installerFullPath

$MSIuninstall = '"' + $installerFullPath + '"'
$MSIArguments = @(
	"/X"
	"$MSIuninstall"
    "/qn"
)
Start-Process "msiexec.exe" -Wait -ArgumentList $MSIArguments

# Step 2: Cleanup other customizations
$customizationsPath = "C:\Temp\7-Zip"
$customizationsExist = Test-Path $customizationsPath
if (!$custom7zipExists) {Remove-Item $customizationsPath -Recurse -Force}
All that is left to do is to copy the scripts to the shell app in NME and toggle the public slider to On to make sure the shell app appears in the unified catalog.
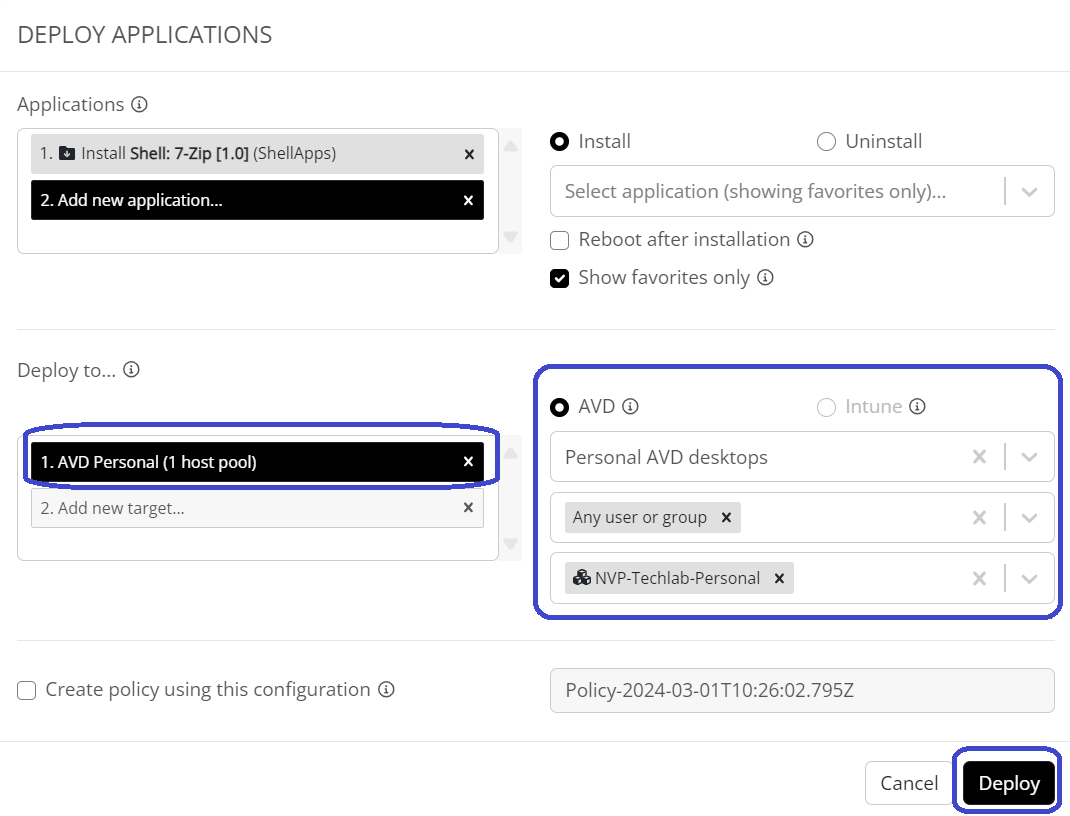
Go to Applications, Unified catalog. Search for the newly created shell app and Click the Deploy button:
- The application is already selected.
- A reboot is not required.
- Enter a group of devices.
- You can check the box to create a policy. This will ensure that the application is installed on new session hosts as well instead of running a one off installation.
- Click Deploy & save.
Here is a screenshot of what I ended up with:
The application will now be deployed on the personal AVD desktop that I’ve selected.
The demo
In the screenshot below we can see that the app and the customizations have made it onto the session host: